TFT Items Explained: Components, Combining and Choosing Item Holders
How items work in Teamfight Tactics: the basic components, how two combine into a completed item, emblems, special items and who should hold them.

Items are one of the main ways you get stronger in Teamfight Tactics, and one of the main ways you can lose a game without realizing why. A good unit holding the wrong items, or the right items spread across three different units, can turn a strong board into a mediocre one. The good news is that TFT’s item system is built on a small set of rules that have stayed remarkably consistent since the game launched in 2019, even as traits and champions change every set.
This guide explains those rules: the basic components, how combining works, the main categories of finished items, special items such as emblems, and how to decide which units should carry your items. If you are new to TFT altogether, our beginner’s guide to how Teamfight Tactics works covers rounds, the shop and the carousel first.
Where Items Come From
You do not buy items in TFT. Instead, they arrive through the flow of the game:
- PvE rounds. Rounds against computer-controlled monsters drop loot orbs that can contain components, gold or other rewards.
- The carousel. On shared draft rounds, every player picks a champion from a rotating carousel, and each champion carries an item. Players with less health pick earlier.
- Augments and other set mechanics. Some augment choices grant components, completed items or special items, and many sets include mechanics that hand out extra rewards.
Because item supply is somewhat random, flexibility matters. You rarely know in advance exactly which components you will get, so a big part of item skill is adapting to what the game gives you.
The Basic Components
The foundation of the system is a short list of basic components. According to the official League of Legends wiki’s TFT section, the standard components are:
| Component | What it adds (broadly) |
|---|---|
| B. F. Sword | Attack damage |
| Recurve Bow | Attack speed |
| Needlessly Large Rod | Ability power |
| Tear of the Goddess | Mana |
| Chain Vest | Armor |
| Negatron Cloak | Magic resistance |
| Giant’s Belt | Health |
| Sparring Gloves | Critical strike chance |
Two further pieces, the Spatula and the Frying Pan, are special components used to build emblems, covered below. Exact stat values are tuned from patch to patch, but the role of each component is stable.
Components are useful on their own. Placing a single component on a unit gives it the component’s stats immediately, which can win early rounds. The real power, though, comes from combining them.
How Combining Works
The core rule is simple: any two components combine into one completed item. If you place a component on a unit that already holds another component, the two merge automatically into the completed item for that pair. Eight standard components produce a full grid of combinations, including items made from two copies of the same component.
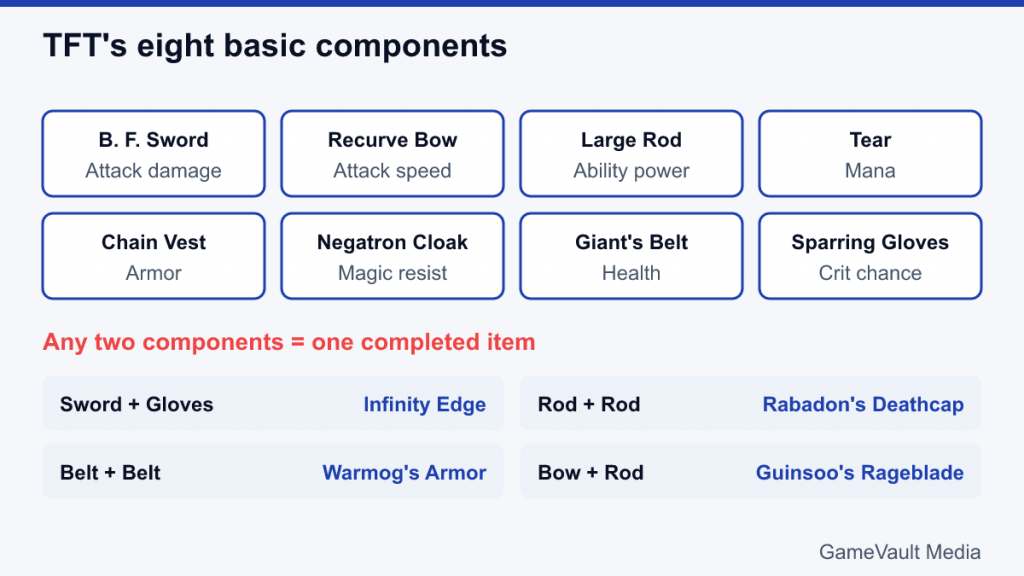
A few examples of long-standing recipes illustrate the logic:
- B. F. Sword + Sparring Gloves = Infinity Edge, a critical strike damage item for attack carries.
- Needlessly Large Rod + Needlessly Large Rod = Rabadon’s Deathcap, a large ability power boost for spellcasters.
- Giant’s Belt + Giant’s Belt = Warmog’s Armor, a large health item for tanks.
- Chain Vest + Chain Vest = Bramble Vest, armor plus reduced damage from critical strikes and damage to nearby enemies.
- Tear of the Goddess + Tear of the Goddess = Blue Buff, a mana item for casters who want to use their ability repeatedly.
- Recurve Bow + Needlessly Large Rod = Guinsoo’s Rageblade, which builds attack speed over the course of a fight.
Riot occasionally renames, replaces or reworks individual completed items between sets, so treat any specific item list as a snapshot. The in-game item recipe panel always shows the current combinations, and it is worth keeping it open until you have the grid memorized.
Each champion can hold up to three items. A unit with three completed items is fully itemized, which is why players talk about “three-item carries”.
Item Categories: Damage, Defense and Utility
It is easier to think about completed items by purpose than by name.
Damage items
Items built from B. F. Sword, Recurve Bow, Needlessly Large Rod and Sparring Gloves typically increase attack damage, attack speed, ability power or critical strikes. They belong on your main damage dealer, the carry.
Defensive items
Chain Vest, Negatron Cloak and Giant’s Belt combinations increase durability: armor, magic resistance, health, shields or damage reduction. They belong on frontline units that need to survive long enough for the carry to deal damage.
Utility and mana items
Tear of the Goddess combinations usually involve mana, letting a unit cast its ability sooner or more often. Other utility items apply effects such as reducing enemy healing, granting crowd control immunity at the start of combat or providing team-wide buffs. Their value depends heavily on the board.
A good rule of thumb is that most strong boards have one or two itemized damage carries and one itemized tank, with utility items filling gaps.
Emblems, Spatulas and Special Items
The Spatula and Frying Pan are rarer components that make TFT’s most flexible items.
- Emblems. Combining a Spatula or Frying Pan with a standard component creates an emblem, which grants a trait to the unit holding it. Emblems let you reach a higher trait breakpoint without an extra champion, or add a trait to a unit that would not normally have it.
- Tactician’s items. According to the official wiki, combining two Spatulas or Frying Pans creates a Tactician’s item that increases your team size by one, letting you field an extra unit.
Which emblems exist depends on the current set’s traits, so emblem recipes change every set.
Beyond regular items, TFT regularly includes higher-tier special items. The official wiki lists several categories used across sets:
- Radiant items: much stronger versions of completed items, usually obtained through specific rewards.
- Artifacts: items with unusual, powerful effects that do not follow the normal recipe system.
- Support items: items that buff allies or debuff enemies, often best on a unit that is not your main carry.
Availability of these depends on the set and on augments, so they are bonuses rather than something to plan around every game. Many sets also offer consumable tools that move or reroll items, such as removers and reforgers, which help you fix mistakes.
Choosing Item Holders
Who holds your items matters as much as which items you make. A few principles:
- Itemize the units you will keep. Items are best on units that will remain on your board into the late game. Giving three items to an early unit you plan to replace means moving them later, which is only possible with item removal tools or by selling the unit, which returns its items to your bench.
- Match items to the unit’s damage type. Attack damage items belong on units that deal damage with basic attacks; ability power items belong on spellcasters. Mixing them up wastes stats.
- Match items to the unit’s job. Tanks want defensive items. A tank holding Infinity Edge is rarely a good use of resources.
- Concentrate rather than spread. Three items on one carry are usually stronger than one item each on three units, because many items amplify each other.
- Use temporary holders early. Early in the game you can place items on whichever unit benefits now, then sell that unit to move the items to your real carry later.
Scouting helps too. If several opponents are building the same carry, the carousel and component competition becomes tighter, and a different direction may serve you better.
Slamming vs Holding Components
One of the most common item decisions is whether to slam a completed item early, combining two components right away, or hold components in hopes of building a specific item later.
- Slamming makes your board stronger immediately, which saves health and can build a win streak. Many strong players slam a reasonable item early rather than waiting for perfect ones.
- Holding keeps flexibility, but components sitting on the bench do nothing for your health total.
A balanced approach is to slam items that are good on many units, such as solid defensive items or general damage items, and hold only when you are close to a clearly better option. Health lost early is hard to recover, and it also affects your economy and streaks. Our explainer on what an auto battler is discusses why tempo and economy interact so tightly in the genre.
Common Item Mistakes
- Holding too many components. Unused components on the bench do nothing.
- Splitting items across units. One strong carry usually beats several half-itemized units.
- Putting damage items on tanks. Frontline units need to survive, not deal damage.
- Ignoring emblems. An emblem that unlocks a trait breakpoint can be more valuable than another damage item.
- Forgetting the recipe sheet. Check the in-game recipe panel before combining, especially after a new set or patch.
A Simple Item Plan for New Players
If the full recipe grid feels overwhelming, a simple plan works well while you learn:
- In the first stages, place components on units that are on your board now. Early stats help you keep health.
- Once you hold two components that make a generally useful item, combine them rather than waiting.
- By the middle of the game, decide on one main carry and one main tank, and route new items to them.
- When your carry has three items, start giving extra damage items to a secondary carry and defensive items to a second frontliner.
- After each game, look at the end-of-game screen and ask whether your items were concentrated on the units that did the work.
Items in TFT reward both knowledge and judgment. Knowing the recipes is the easy part; reading which items your current board actually needs, and committing to them at the right moment, is where the real skill lies.